
How to find the right grind for your coffee machine Part 2 – When to adjust and problems to avoid
In this second part of our two-part series on how to find the right grind for your coffee machine – we’re addressing real scenarios to help guide you through. The previous article, part 1 of how to find the right grind for your coffee machine series, detailed the grinders functions and adjustments. It also covered the correlation between espresso and the ground coffee particle size. This post covers when & how to adjust your grinder and problems to avoid.
CAUTION! Ensure you read part 1 & part 2 posts before grinding any coffee. Especially if you’ve never used a grinder before.
Setting the right grind.
Standard espresso extraction recipe
Our definition of espresso gave you the following parameters to work with:-
Finely ground coffee dose = 7-9 gms
Water temperature = 90-97 deg. C
Water pressure = 9 bar
Extraction time = 25-30 sec’s
Extracted espresso coffee volume = 25-30ml
It’s important to adjust your grinder when any of the espresso brewing parameters are under or over exceeded.
Note: Today you’ll find espresso extraction recipes on packets of coffee. They vary depending on the brand and coffee. These may make you feel a little intimidated. At this stage, avoid stressing over them, as many people find them subjective.
I would strongly recommend you keep things real and simple, especially at the beginning. Otherwise, you’ll end up stressing over constant minute adjustments in order to set the right grind for ever changing recipes. As a result, you’ll end up wasting half the packet of coffee to achieve each recipe. I’m not against varying espresso extraction recipes, but half a gram or a couple of seconds either way is difficult for most people to taste.
By keeping things simple and consistent, you’re getting a fair representation of all the different coffees you try. And this will allow you to understand the different flavours they offer. Once, you’re comfortable and feel like experimenting with your ground coffee dose or espresso volume, then by all means do so.
Visual guides – the Crema & coffee flow

Perfect Espresso

Perfect Flow
The crema by default should be honey/mahogany
coloured. It may also appear to have some irregular dark brown spots & stripes on it.
In addition the crema should hold for a couple of minutes and not
dissipate quickly.
The crema & the extraction flow are your most obvious visual guides in preparing the perfect espresso.
It’s important to look and memorize how each of your coffees extraction rates flow. With a little experience, you’ll know as soon as you see the first drop, that you’ve set the right grind. Bravo! Or, that you’ll need to make an adjustment.
How to adjust your grinder
A finer grind adjustment slows the flow rate. A coarser grind adjustment speeds up the flow rate.
With any adjustment of the grinder, it’s important to ensure that the grinder is not running.
1. The stepped adjusting wheel.

Stepped adjustment
Press down the locking pin on the collar. Adjust the setting no more than two notches and test the extraction rate.
Ensure the locking pin clicks into the new position before turning on the grinder. Readjust if needed.
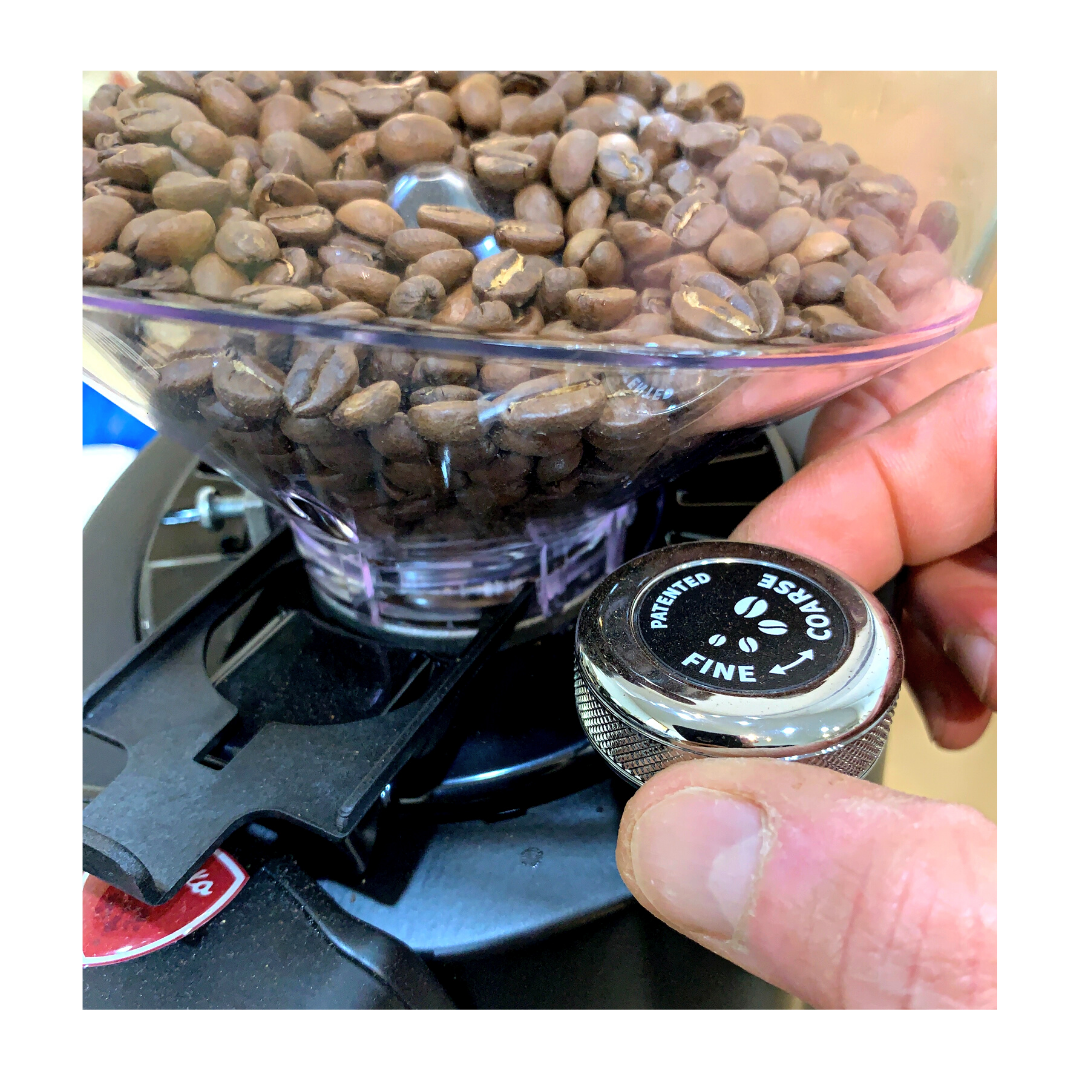
2. The infinite adjusting wheel/knob.

Infinite Adjustment
Turn the adjusting knob/wheel in the desired direction around 2 mm max.
Test the extraction rate. Readjust if needed.
Problems to avoid
Don’t assume when you stop grinding that the grinder blades are free of coffee.
Extreme caution must be taken when a finer grind adjustment is required.For two reasons:-
- To prevent locking up the blades.
- To avoid making the blades touch each other (metal to metal).
The golden rule before adjusting your grinder.
Isolating variables will help you in finding the right grind.
Using your grinder for the first time
It’s very important that settle the grinding blades and prime your grinder before making any coffee!
If you feel this is all too much for you, then we encourage you to book our Home Barista Training course and bring your grinder along.
How to stop going around in circles looking for the right grind.
By keeping all variables constant will take out the frustration and help you in adjusting your grind particle size.
Most coffee machines are preset with the water temperature and pressure. In saying that, there are now coffee machines that allow the user to vary the water temperature. There’s also a few that offer variable water extraction pressure options.
Caution!
Most coffee grinders tend to retain a small amount of ground coffee within the grinding discs housing. To avoid over correcting your grind setting, it’s important to remove the retained coffee (which is at the previous setting). So, firstly adjust the grinder collar/knob. Then grind a small amount of coffee (say enough for one coffee, approx. 9 grams) and discard.
 So now, the coffee retained in the grinding disc collar is the new adjusted particle size. Hence now, when you grind coffee, what comes out represents the new grind setting particle size. If you forget to follow this step, the ground coffee that will come out will be from the previous ground particle size. And, as a result will give you an inaccurate indication of your flow rate. You’ll be overcorrecting. What this means is that your jumping one step ahead in your adjustments and you’ll get frustrated.
Caution: ensure you firstly set the grind texture and then grind and discard around 9 gms of coffee. And then grind coffee for testing.
When and which way to adjust your grinder
Your grinder should be adjusted only when you see that the extraction rate is way below 18 seconds and above 40 seconds for a 30 ml espresso shot.

Coffee Lover
Time the extraction rate as soon as you press the brewing button. (not when the actual coffee starts dripping).
Any grinder adjustments are for the sole purpose of improving the flavour of your espresso.
Scenario 1.

Flow too fast
Let’s say you’ve made an espresso and it took 12 seconds to extract around 30 mls and the the crema is a touch pale and dissipates quickly. In this case, I would adjust my grinder in the finer direction around 2mm on a infinite grinder and 1-2 notches max. on a stepped grinder.
Senario 2.

Flow too slow
Let’s say you’ve made an espresso and it took 45 seconds to extract around 30 mls and the the crema is dark. What this means is that the grind is too fine. In this case, adjust your grinder in the coarser direction around 2mm on a infinite grinder and 1-2 notches on a stepped grinder.
Depending on the direction you turn the adjusting wheel, you’re increasing or decreasing the distance between the blades. By increasing this gap you’re making the coffee coarser which will speed up the flow rate. Alternatively by decreasing the gap you’re making the coffee grind finer which will slow down the flow rate.

Guy Vaillant
August 19, 202211:19 amThank you Paul, your senario 1 and 2( fine or coarse grinding) make us aware of what we will need to do before using the expresso machine. I guess, it is important to get the perfect coffee beans as they are different depending on the origin.
Paul Mannassis
August 20, 202211:50 pmMy pleasure Guy. Yes indeed, each origin will need it’s own grind adjustment. Their flavours too are very diverse as you will experience.
Dominic
July 6, 20239:50 pmJust did Day 1 of a barista course with Paul and it was great! Sound grounding in the technical aspects of how a great espresso is made. Really good. Thoroughly recommended.
Paul Mannassis
July 11, 202311:21 amThanks for your feedback Dominic. I’m sure you’re now loving the ‘crema’ on your espressi.