
How to backflush your espresso machine
How to backflush your espresso machine. As a general rule a home espresso machine should be chemically backflushed once a month. However if your household is consuming 500g or more per week, then chemically backflush weekly.
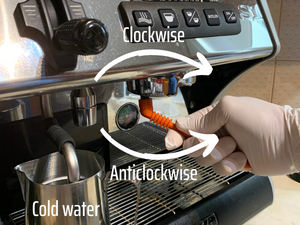
- Clean group seal and steam wand
Rotate group head (GH) brush around group seal in a clockwise nd anti-clockwise motion. Now diagonally hold the GH brush and rotate both clockwise and anti-clockwise to clean around the lug track where the coffee handle sits. Soak steam wand in fresh cold water. - Add Machine clean powder

The blind filter is used to backflush your espresso machine, it’s the one without any holes. Some machines have a rubber disc instead. Insert blind filter into porta filter coffee handle and add 1/4 of a teaspoonful of Machine cleaner powder. Book a service here.
NOTE: Your Mini Vivaldi coffee machine must be at operating temperature for the Machine cleaner to work effectively. - Dissolve Machine cleaner

Purge a small amount of water from the group onto Machine cleaner powder and dissolve using with the back of the teaspoon. - Back-flush group

Wearing your gloves, place coffee handle firmly into group. Activate group to backflush your espresso machine by turning on coffee button and allow to run for 5 seconds, then stop it. Repeat another 5 times.
CAUTION: DO NOT MOVE COFFEE HANDLE DURING THIS PROCEDURE. YOU’LL RUN THE RISK OF DISLODGING THE GROUP HEAD SEAL OR EVEN WORSE SCALD YOURSELF.
NOTE: Whilst using the blind filter no water will run from the spout. Each time you stop the group from running the pressurized water is released into the drip tray. You’ll also notice a whitish/brown foam in the drip tray, this is the Machine cleaner working. It dissolves all the coffee residue in the shower, group head and valve. - Purge group

Purge the group using the coffee button and allow the water to run freely until the machine stops automatically. Repeat this step another 4 times. - Back flush with fresh water only
Place coffee handle firmly into group. Activate group by turning on coffee button and backflush your espresso machine for 5 seconds, then stop it. Repeat another 5 times.
CAUTION: DO NOT MOVE OR REMOVE COFFEE HANDLE DURING THE BACK FLUSH PROCEDURE. YOU’LL RUN THE RISK OF DISLODGING THE GROUP HEAD SEAL OR EVEN WORSE SCALD YOURSELF.
NOTE: Whilst using the blind filter no water will run from the spout. Each time you stop the group from running the pressurized water is released into the drip tray, (back flush). - Purge group

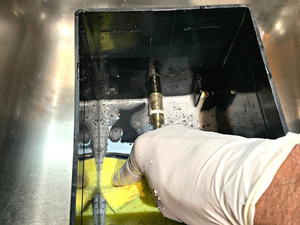
Purge the group using the coffee button and allow the water to run freely into the drip tray until the machine stops automatically. - Remove shower and diffuser block

Remove water jug and wipe steam wand. Using the special shower spanner unscrew the bolt situated in the center of the shower. - Remove showers and diffuser block

Using the special wire brush, clean the underside of the group head and wipe with a clean wet cloth. - Chemically clean showers, diffuser block, porta filter baskets and handles

Dissolve 2 teaspoonful of Machine cleaner into a container of hot water. Submerge showers, diffuser block, handles and coffee porta filter baskets.
CAUTION: DO NOT ALLOW THE PLACSTIC PART OF THE HANDLES TO SOAK IN THE SOLUTION. THEY WILL DISCOLOUR OVER TIME AND BECOME ABRAISIVE. - Scrub all parts with soap and water

Using a clean plastic scourer and mild soapy water, scrub clean coffee handles, coffee porta filter baskets, diffuser and showers. Thoroughly rinse with fresh water.
CAUTION: DO NOT USE A METAL SCOURER OR STEELWOOL AS IT WILL LEAVE AN UNPLEASANT METALLIC ODOUR. - Wash drip trays
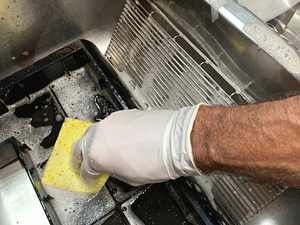
Using a clean soft sponge and mild soapy water, thoroughly remove all coffee residue and rinse off with cold water and wipe dry. - Wash water tank
Remove filter pouch. Using a clean soft sponge and mild soapy water clean any mildew build up and also wash the outside of the tank. Rinse with cold water and wipe dry. - Place showers and diffuser back

Ensure you replace the showers in the exact position as shown above before installing them into the group head. - Final check

Thread the bolt through the showers and diffuser and fasten into group head finger tight. Tighten a little more with the special shower spanner (not too tight).
NOTE: THE SIDE WITH THE WIDER FLAT CIRCUMFERENCE OF THE DIFFUSER AS SHOWN ABOVE IS THE SIDE THAT WILL SIT ONTO THE UNDERSIDE OF THE GROUP HEAD. - Wipe the body panels clean

Using a moist soft sponge with mild soapy water gently clean all panels and dry off immediately with a soft micro-fiber cloth to avoid streaks. Place filter pouch into water tank and fill with fresh cold water. Replace water tank, drip trays and you’re done.
NOTE: When you’re going to make coffee after chemically backflushing you need to prime the group head by making a fresh coffee and allowing it to run into the drip tray. Now discard the spent coffee grains from the portafilter and repeat two more times with fresh coffee. Your machine is now ready for you to enjoy the next cup.
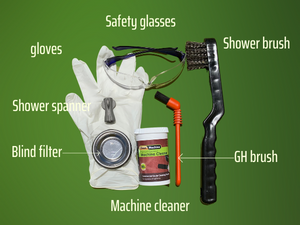
HANDY HINT: It’s a good idea to coordinate your grinder cleaning when backflushing as you will have freshly ground coffee that needs discarding whilst priming your grinding blades from the grinder clean pellets. This way you minimise coffee waste. - What you’ll need
Dominic
July 11, 20237:35 pmVery clear explanations! Thanks Mocha Coffee.
Paul Mannassis
July 14, 20234:42 pmYour welcome Dominic.